Introduction- by Wired Geekz
Every day, computer users touch their keyboards and mice hundreds, even thousands of times. Yet, most rarely stop to Clean Your Keyboard and Mouse the right way—until sticky keys, dust, or mystery grime become impossible to ignore. In 2025, increased remote work and digital lifestyles make it more important than ever to understand, appreciate, and master the Right Way to Clean Your Keyboard and Mouse.
These essential peripherals harbor not only dust and crumbs but also bacteria and microbes, making hygiene a matter of both comfort and health. This exhaustive guide will empower you to confidently, efficiently, and safely Clean Your Keyboard and Mouse, whether you use a classic desktop setup, a wireless combo, or a top-end mechanical keyboard for pro-level gaming.
Why You Must Regularly Clean Your Keyboard and Mouse
Keyboards and mice are among the most-touched and least-cleaned items in most homes and offices. Ignoring regular maintenance does more than lead to cosmetic issues: it poses real health risks and can degrade device performance over time.
1. Hygiene and Health
Devices can harbor bacteria, viruses, and allergens. Regularly taking time to Clean Your Keyboard and Mouse helps prevent illness, reduce allergy symptoms, and stop the spread of germs, especially in shared workspaces.
2. Device Lifespan
Ensuring you always Clean Your Keyboard and Mouse can prevent sticky key failures, irregular cursor movements, and unresponsive buttons. Dust buildup can insulate heat or block sensors, shortening your device’s useful lifespan.
3. Typing Accuracy and User Experience
Oils and debris eventually transfer from fingers to keys and mouse surfaces, reducing grip, comfort, and even accuracy. A proper approach to Clean Your Keyboard and Mouse keeps every click and keystroke as satisfying as the day you unboxed your tech.
Getting Started: Supplies You’ll Need
Before attempting to Clean Your Keyboard and Mouse, gather the appropriate cleaning essentials for optimal results and device safety. Efficient, proper care also starts with disconnecting devices: always unplug wired hardware and remove batteries from wireless models prior to cleaning.
| Tool | Best For | Where to Find |
|---|---|---|
| Compressed air | Dislodging dust, hair, crumbs under keys | Electronics stores |
| Microfiber cloth | Removing smudges, oils, surface grime | Tech/grocery stores |
| Isopropyl alcohol | Disinfecting, killing germs, dissolving stubborn grime | Pharmacies, online |
| Cotton swabs/Q-tips | Detailing between keys and in mouse crevices | Pharmacies, grocery |
| Keycap puller | Safely removing keyboard keycaps on mechanical boards | Online, PC shops |
| Soft brush/paintbrush | Sweeping out dust, scrubbing seams | Art supply, PC shops |
| Mild dish soap | Washing keycaps and mouse shells | Grocery, pharmacies |
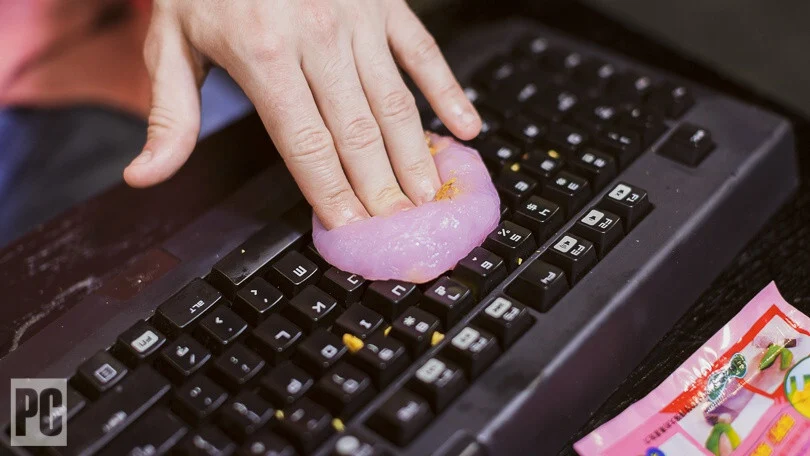
| Cleaning gel/putty | Picking up micro-debris from hard-to-reach keyboard areas | Online, PC shops |
| Toothbrush/Interdental brush | Detailing, getting between and under keys or buttons | Online, drugstores |
Never use bleach, abrasive sponges, or direct sprays of any liquid on electronics—these can ruin finishes and seep into circuitry, causing damage.
Quick Clean: Daily and Weekly Maintenance Routines
How often should you Clean Your Keyboard and Mouse? Fast, simple cleaning is recommended as a weekly habit, and more thorough deep-cleaning every month or two for heavy users. Here’s how to quickly keep surfaces hygienic and functional:
1. Shake and Tap to Remove Loose Debris
-
Turn devices upside down over a trash can.
-
Gently tap or shake to dislodge loose dust or crumbs.
-
For laptops, always shut down beforehand.
2. Compressed Air for Dust Control
-
Use a canister of compressed air upright.
-
Spray short bursts across keys or around the mouse.
-
Zigzag between rows; avoid holding the can sideways or upside down to prevent liquid discharge.
-
Optional: Use a small, soft brush for more stubborn visible matter.
3. Microfiber Wipe-Down
-
Lightly dampen a microfiber cloth with water or a small amount of 70% isopropyl alcohol.
-
Wipe down all exposed surfaces: keyboard tops, mouse buttons, sides, and wheel.
-
Allow devices to dry fully before reconnecting.
A fast way to Clean Your Keyboard and Mouse is to always keep a handy microfiber cloth within reach, tackling fingerprints and dust before they accumulate.
Deep-Cleaning Your Keyboard: The Right Way Explained
Mechanical Keyboards
-
Unplug the device and (optionally) photograph it for remembering key positions.
-
Use a keycap puller to remove all keys. Soak the keycaps in warm, soapy water for at least 30 minutes.
-
While soaking, clean the underlying board with compressed air, a brush, and for sticky grime, a Q-tip dipped in isopropyl alcohol.
-
Gently scrub stubborn debris from keycap sides using a toothbrush or interdental brush.
-
Rinse keycaps thoroughly and let them dry completely.
-
Reassemble only once everything is 100% dry.
Membrane/Standard External Keyboards
-
Follow above, but be gentler—membrane sheets are easily damaged.
-
Never allow water to seep below the keys or near USB connectors.
-
Some dedicated washable keyboards can be submerged—check manufacturer guidelines first.
Laptop Keyboards
-
Shut down and unplug.
-
Use compressed air and a brush between keys for debris.
-
Carefully pass a slightly dampened cotton swab with isopropyl alcohol along spaces.
-
Dry with a lint-free cloth and avoid moisture pooling.
-
Never flood a laptop keyboard—liquid will destroy internal components.
Deep-Cleaning Your Mouse: The Complete Process
Mice, especially used by gamers, often accumulate oil, dead skin, and debris around buttons and in the sensor opening. Here’s the right way to Clean Your Keyboard and Mouse, focusing on the mouse:
-
Unplug or remove batteries.
-
Wipe the shell, buttons, and wheel using a microfiber cloth moistened with diluted isopropyl alcohol (never pour liquid directly).
-
For stubborn residue or gunk in tight grooves, use cotton swabs or a soft toothbrush.
-
Clean the optical sensor window with a dry cotton swab.
-
For scroll wheels, compressed air can blast out hidden dust.
-
Dry thoroughly before reconnecting. For mice with removable shells, rare but possible, clean the interior gently and never wet the electronics.
Using disinfectant wipes is fine; just avoid wetting any seams or charging ports. Keeping this as part of your plan to Clean Your Keyboard and Mouse wards off sticky hands and tracking issues.
Specialty Cleaning: Gaming Accessories and Custom Devices
RGB, backlit, or wireless devices require a more careful approach due to added electronics.
-
Clean lighting grooves and seams with isopropyl-soaked cotton swabs.
-
Take extra care with wireless battery compartments: wipe, don’t saturate.
-
Mouse pads and wrist supports: wash fabric covers with gentle soap and air dry.
Mechanical gaming keyboards may have switch lubing or custom parts—only disassemble beyond keycaps if comfortable with advanced repair and always follow guides to avoid breaking small connectors or switches.
Pro Secrets & Troubleshooting Emerging Problems
Sticky Keys
If a key sticks even after cleaning, debris may be lodged deeper or a spill has left residue. For stubborn stickiness:
-
Remove the affected cap, and use a Q-tip with alcohol to clean down in the switch.
-
If the problem persists, you may need to carefully open the switch with specialized tools—not recommended for beginners.
Mouse Double-Click Issues
Repeated clicks can mean dust or residue interferes with button contacts.
-
Blowing compressed air between button gaps and gentle alcohol cleaning can offer a temporary fix.
-
If the problem continues after multiple cleans, the switch may need replacement.
Remember: The best way to Clean Your Keyboard and Mouse is to act early—routine care is the easiest way to prevent wear and performance loss.
The Science of Cleaning: Sanitization and Disinfection for Health
Modern times make sanitization a priority. Alcohol solutions (at 70% or less) safely eliminate most bacteria and viruses on hard surfaces, including keyboards and mice. For maximum peace of mind, use prepackaged disinfectant wipes—but always squeeze out excess liquid before using on electronics.
Quick Reference Table: Cleaner Choices
| Cleaner Type | Safe For | Avoid Using On | Effectiveness |
|---|---|---|---|
| Isopropyl alcohol | Plastic, keys, shell | Circuits, screens | 5/5 |
| Alcohol wipes | Buttons, palms | Direct on circuit | 5/5 |
| Mild dish soap | Keycaps, mouse shell | Internal board | 4/5 |
| Bleach/ammonia | Never | All electronics | 0/5 |
The Importance of Drying and Safe Reassembly
After deep cleaning, always:
-
Allow all parts to dry at least overnight.
-
Never force keycaps onto wet switches.
-
For laptop keyboards, never power up until not a hint of moisture is left.
Skipping proper drying after you Clean Your Keyboard and Mouse can reverse all your hard work and cause permanent damage.
Common Mistakes to Avoid When You Clean Your Keyboard and Mouse
-
Using too much liquid: Always wring out cloths so they’re only slightly damp.
-
Skipping proper drying: Trapped moisture destroys electronics.
-
Forcing keycaps back: This leads to broken stems and poorly seating keys.
-
Neglecting regular routine: Waiting until performance drops or dirt is visible makes cleaning harder and less effective.
-
Spraying directly onto devices: Always apply liquids to the cloth, never the device itself.
DIY and Advanced Cleaning: Can You Use Ultrasonic Cleaners?
Ultrasonic cleaners, popular with enthusiasts, can be used to clean plastic keycaps and some mouse shells, though these are not necessary for general users. Never submerge electronic parts in these devices. For ultra-thorough deep-cleans, this is reserved for non-electronic subcomponents only.
Cleaning Schedules for Different User Types
| User Type | Cleaning Interval (Light) | Deep Clean Recommended |
|---|---|---|
| Everyday office user | Weekly microfiber wipe | Monthly compressed air, quarterly soak |
| Gamer | Twice-weekly wipe, air | Monthly, full deep clean every 3-4 months |
| Shared/public | After every shared session | Weekly deep clean, full disinfection |
| Laptop/remote | Weekly air and surface | Every 2 months minimum |
Over time, a custom schedule helps keep the habit sustainable and ensures you always Clean Your Keyboard and Mouse at the right times.
Tips for Maintaining a Clean Workspace
-
Wash your hands before using your devices to minimize transferred grime.
-
Don’t eat directly above your keyboard or mouse.
-
Store keyboards and mice away from dusty or humid environments when not in use.
-
Use dust covers for extended periods of inactivity.
Setting up a clean environment goes hand in hand with your mission to regularly Clean Your Keyboard and Mouse—it’s a holistic effort.
Green Cleaning: Eco-friendly Methods and Supplies
If you wish to Clean Your Keyboard and Mouse in an environmentally responsible way:
-
Choose biodegradable cleaning wipes or cloths.
-
Use reusable compressed air pumps, avoiding disposable canisters.
-
Select plant-based soap for soaking keycaps and shells.
Many modern keyboards and mice are made from recyclable plastics; prolonging their life with proper cleaning also reduces e-waste.
Frequently Asked Questions (FAQ)
Q: Can I use hand sanitizer to Clean Your Keyboard and Mouse?
A: Hand sanitizer usually contains moisturizers that can leave residue. Stick to 70% isopropyl alcohol for the best result.
Q: Is it safe to clean my wireless devices the same way?
A: Yes, but always remove batteries to avoid shorts. Don’t get liquid near charging ports or battery contacts.
Q: Should I remove my mouse feet for cleaning?
A: For routine care, no. Only remove them if you notice poor glide specifically caused by trapped dirt.
Professional vs. DIY Cleaning – When to Call in the Pros?
Most users can learn to Clean Your Keyboard and Mouse thoroughly at home. Professional cleaning may help for:
-
Restoring used or inherited devices to like-new condition
-
Restoring devices after a major spill (coffee, sugary substances)
-
Removing mold, caked-on oils, or stubborn stains
-
Guaranteed deep sanitation in healthcare, public, or food service settings
Professionals use high-grade disinfectants, ultrasonic cleaners (for safe parts), and industrial-grade air compressors.
Upgrades and Tools That Help Keep Devices Clean
-
Keyboard covers: Transparent silicone protectors defend against spills, especially for frequent snacking or public-use PCs.
-
Antimicrobial mice and keyboards: Some models now include antimicrobial additives to plastics to reduce overall contamination risk.
-
Self-cleaning keyboards: Emerging technologies offer auto-UV sterilization cycles or washable designs—already present in work environments concerned with the highest hygiene standards.
Consider these when replacing or upgrading to make it even easier to Right Way to Clean Your Keyboard and Mouse in the future.
Future Trends: Smart Cleaning and Automation
In the next few years, “smart” devices may remind you to Clean Your Keyboard and Mouse after high usage or facilitate self-cleaning. UV LED disinfection, built-in airflow systems, and automated debris collection are on the horizon, bringing high hygiene standards into offices and homes worldwide. Right Way to Clean Your Keyboard and Mouse
Conclusion
No matter the device or environment, learning the Right Way to Clean Your Keyboard and Mouse the right way is a skill worth cultivating. Combining a wise routine, the right tools, and a little patience protects your health, your technology, and your productivity—every day.


Leave A Comment